Some types of repair work cannot be done without the help of a professional. Others are easy to implement yourself, which will reduce not only costs, but also the time of waiting for the master. One of these cases is the replacement or installation of a mixer (faucet) in the bathroom . What is required for installation work? This, as well as what to pay attention to when choosing, will be discussed in the article.
Varieties
Faucets (mixers) differ not only depending on the room in which they will be installed, but also on the place where the installation is planned. Among the main types, the following are distinguished:
- wall;
- for the sink;
- recruiting;
- on racks;
- for the soul
Each of them has its design features. The wall mixer is usually attached at two points of the wall plane. This is done with the help of special adapters called eccentrics. Such options can be universal and can be used both for a sink and for a bath at the same time. A mixer of this type is easy to place at any convenient height. They are often equipped with a long spout through which water is supplied. The faucets for the sink are a smaller design compared to the wall-mounted version. The product is fixed using a special plate and tightening nut. For its installation, a special hole in the sink is required. Sometimes you have to make it yourself.
Set mixers are distinguished by their interesting appearance. In appearance, they look like separate structures. It often gives the impression that the valves are mounted separately from the goose. Such mixers are usually mounted on the side of the bathtub, less often on the sink. This option is often represented by exclusive models and has a sky-high price tag. Mixers on racks are often used for installation in a pair with a bath, which is not located in the walls, but closer to the middle of the room. A special rack is supplied with the faucet, through which it is connected to the water supply system, and the mixer is installed on it.
Separately, you can highlight the option of a shower mixer. It belongs to wall structures since its installation is carried out similarly. The design of such a crane is simplified, since it does not have a goose or it is made very small. In the upper or lower part of such a product there is a thread for connecting a hose to a watering can. Such a module is often used if a separate faucet is installed on the sink. Differences in mixers can also lie in design features.
They are distinguished by:
- fully rotating;
- semi-rotary;
- leverage
The first two subspecies are combined into a general group of valve products. They provide for the presence of two valves for regulating the water supply. In the first case, they need to be rotated several times to achieve the desired result. In the second, it is enough to turn the knob half a turn. Fine-tuning the temperature is easier with the use of fully rotating options.
Products of the lever type have become very popular. They are also called ulnar. It is based on a plastic or metal cartridge, inside which the mixing of two liquids takes place. The pressure is regulated by the height of the lever, and the temperature varies depending on the angle of its position. Usually, the manufacturer provides a special overlay with symbols to make it easier to navigate.
Pay attention ! Mixers with touch and button control should be singled out in a separate group.
The temperature for them is set by fine-tuning since it cannot be changed during operation. The sensor version is activated as soon as the user’s hands are detected under the infrared sensor. The button faucet is a simplified design that functions for a limited time, which is measured by the time it takes for the spring to return to its normal position. Such faucets are often used on sinks in public restrooms.
Installation process
Some steps in the installation of different types of faucets may be similar, but each requires a special approach. Before starting any work, it is necessary to carefully familiarize yourself with the delivery set, as well as with the recommendations that can be set out in the instructions from the bathroom remodel company.
Wall version
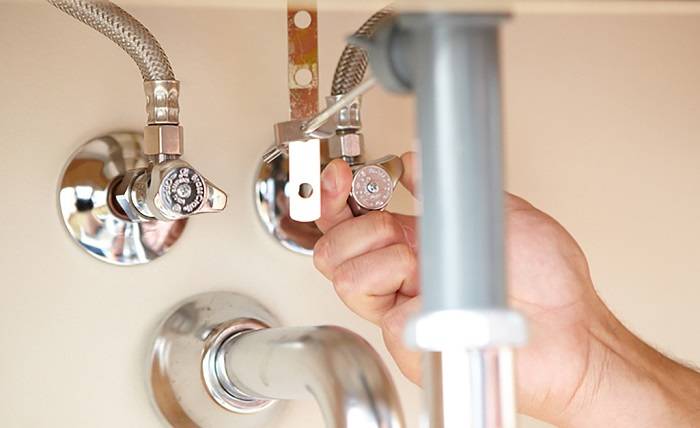
The guarantee of ease of installation of such a mixer will be the correct preparation of the water supply holes. If the wiring was not done in the process of laying communications and when finishing the bathroom with tiles, then it will be necessary to install mounting corners or a mounting bar under the faucet. The correct height for it is considered to be a distance of 30 cm from the edge of the bathtub. Wall mixers are manufactured according to a certain standard, which consists of a certain interaxial distance. Most often there are options with an indicator of 15 cm, less often you can find products with a distance between axes of 10 cm. This must be taken into account when buying a mounting bar or when installing corners.
The next step is to clean the threaded connections from various debris that may have gotten there during the installation work. This is done so that large particles do not get inside the mixer, which will block the normal flow of liquid in it. The next step is to try on the eccentrics that come in the kit. Such a procedure will allow you to make sure of the good quality of the thread, as well as to approximately see the amount of necessary sealant to continue the installation.
Teflon tape is wound on the part of the eccentric that will be installed in the wall thread. Its amount is determined depending on the circumstances, but usually eight counterclockwise rotations are enough. After completing the winding process, it is necessary to press the seal well so that the thread turns are visible. One element is screwed in. Its position is chosen depending on how the mixer should be located. After fixing, the second element is screwed in.
The elements must be displayed in a horizontal plane. This requires a bubble level. It is important to observe this nuance so that the mixer is also located evenly. When the eccentrics are in place, you can try the mixer on them. If the nuts are tightened without much effort and distortion, then everything is done correctly. If there is some tension, then you need to change the position of one or two eccentrics. The mixer is dismantled and decorative overlays are put on the threads, which should cover them. Silicone gaskets, which are supplied in the kit, are inserted into the faucet nut, and it is mounted in its place.
Advice ! A tow can be used as a seal when installing the mixer, but in conjunction with it, a special Unipak composition is required, which will simplify disassembly if repair work is necessary.
Set mixer
Installation of a set mixer is not much more difficult than a wall-mounted one. The main difficulty lies in the correct location and drilling of holes for the mixer. First of all, it is necessary to determine how many parts of the mixer require drilling holes. A place on the bathtub is selected for each element of the mixer. The element is attached to its location and circled with a marker or pencil so that it is visible what size hole is required for it.
It is more difficult to drill holes in metal bathtubs than in acrylic ones. For this, you will need a drill, a metal drill with a diameter of 5 mm and a crown cutter for metal. It is necessary to mark the point where drilling will be carried out with a corner. The first step is to drill a centering hole with a regular drill. After that, a small tub of plasticine is made around the specified contour of the part. Water is poured into it. It is necessary for cooling. Next, a larger hole for the faucet is drilled using a crown. The revolutions should not be high, because it is possible to damage the crown itself, and the surface of the bath.
When all the holes for the faucet are prepared, you can begin its installation. It is carried out according to the algorithm shown in the photo above. The installation of the faucet on the sink is carried out in the same way. If we are talking about a ceramic structure, then the holes in it are made at the factory. Holes in acrylic baths are drilled with a conventional woodcutter. Thanks to it, the edges of the hole come out more neatly than in the case of a metal cutter.